# Welcome to Odyssey
## Introduction
Odyssey is a **pixel streaming platform** where you can deploy and stream your Unreal project (UE5.1+) on any browser or device. It also has:
* **No CCU limits.** You can hit 1000 CCU without needing to notify us.
* **Easy pay-as-you-use pricing.** Buy streaming hours upfront ($3 /hr), and they drain on per-minute basis as users stream your content.
* **Instant multiplayer.** Turn any project into a deployed multiplayer experience with spatial voice & video.
* And other cool features like **configurators**, **avatars**, **runtime model importers**, and more...
## Start with the basics
## Explore our features
[**Embed API**](/embed-in-a-website/enable-embedding)
[**Instant multiplayer**](/instant-multiplayer/quickstart)
[**Spatial voice & video**](/instant-multiplayer/spatial-voice-and-video)
[**Avatars**](/instant-multiplayer/avatars)
[**Sketchfab importer**](/realtime-configurator/sketchfab-importer)
[**Actor importer**](/realtime-configurator/actor-importer)
# Getting Started
## Create an account
First [create an account](https://app.odyssey.stream/profile/create), or [log-in](http://app.odyssey.stream/). If you are creating an account you'll be directed automatically to create an organization.
You can create an organization without entering any billing info.
## Set up billing
You can upload projects, and explore our example content without entering billing information. When you want to begin streaming you will need to choose a subscription and set up payment on Stripe.
You can add payment info by following this button on your dashboard:
## Add stream credits
Once you've added payment info you'll be able purchase stream credits. 1 credit = 1 user stream hour.
When you first create an organization you are given two free stream credits. To add more credits click on the following button on your dashboard:
You can learn more about managing your billing here: [Subscriptions](/admin/subscriptions), and about the underlying GPUs Odyssey uses here: [Our GPUs (Coreweave)](/faq/our-gpus-coreweave)
# Set up your project
Setting up your Unreal project for streaming is simple. Any project with UE version 5.1 or above will work with Odyssey.
## Enable Pixel Streaming Plugin
1. Open your project
2. Go to Edit -> Plugins
3. Search for the Pixel Streaming plugin and enable it.
{% hint style="info" %}
Ignore the Pixel Streaming Player plugin.
{% endhint %}
## Disable Hardware Raytracing
Hardware raytracing needs to be disabled, as it's not supported by Linux Vulkan (this will be fixed by Epic on the 5.4 release).
Lumen, Nanite, and Virtual Shadow Maps are all still fine to use however.
# Package for Linux (it's easy)
## Why Odyssey uses Linux
You're probably wondering why your project needs to be packaged for Linux. While Windows-based pixel stream systems are great if you only need a small number of users to access your project, they do not scale well.
Odyssey is built for dynamic scaling of Unreal pixel streaming sessions, where 1000+ users could join your session in an instant. The only way that massive scaling is possible is by using Linux builds.
## Installing Linux toolchain (it's easy we promise)
1. [Download the Linux Cross-Compile Toolchain](https://docs.unrealengine.com/5.3/en-US/linux-development-requirements-for-unreal-engine/) for your Unreal Engine version. Here is the correct download for 5.2:
Cross-Compile Toolchain compatible with Unreal Engine version 5.2
2. Open the downloaded file to install the Cross-Compile Toolchain. Just leave everything at default... And that's it! You're ready to package to Linux now.
## Package your project for Linux
1. Open your project
2. Select Platforms -> Linux -> Package Project
3. Select an output directory and wait for the packaging process to finish.
4. Go to your packaging output directory (`Linux`) and zip the directory (**right click -> Compress to ZIP file**).
# Upload your project
## Upload through the dashboard
Once you have prepared your project, you can upload it using our web uploader by following these steps:
1. Navigate to your organization dashboard and go to the `Projects` tab.
2. In the top right corner, you'll find the `+ New project` button. Click it to open the uploader.
Project page
3. Provide a name for your project.
4. Click into the uploader to select your zipped project, or drag it into the upload box.
5. Click the `Create project` button to initiate the upload process.
Select a project to upload
6. The next page will ask you the build type of your project. Select `Linux Build` then the `Create project` button.
Select Linux build
7. You'll now see the upload progress percentage. Upload times may vary depending on the file size and local internet speeds.
{% hint style="warning" %}
Do not navigate away from this page while the upload is in progress.
{% endhint %}
Upload in progress
7. Once the upload is complete, you will be directed to the project management screen. You can see your project's deployment status at the top of this page. Your project will be validated by Odyssey before deployment, which usually takes < 1 minute.
# Create and publish your space
In Odyssey, a **space** is a URL where your audience can access your project. You can create as many of these as you want per project.
Each space has its own settings, share permissions, and multiplayer server.
## Create a space
1. After uploading your Unreal project, open the project's settings page.
2. Click the `Create new space` button here:
## Edit any settings and enter your space
1. Once you've made your space you'll be in its settings panel.
2. When you're ready to jump in click the `Go to space` button.
{% hint style="info" %}
To enter a space you'll need to set up billing. Read more here: [Subscriptions](/admin/subscriptions)
{% endhint %}
## Publish your space
1. You can edit your space settings at any point by clicking the Odyssey logo:
Accessing your space settings while loading
2. In the Settings menu navigate to Sharing.
3. For now let's make the link publicly available. Toggle on `Publish space`
4. :tada: Your Unreal project is now public! Use `Copy link` and you have your live URL ready to share.
{% hint style="info" %}
You can read about how to fine-tune your permissions here: [Sharing and permissions](/admin/sharing-and-permissions)
{% endhint %}
# Quickstart
Instant Multiplayer overview and quickstart
**Instant Multiplayer** allows you to easily turn any unreal project into a multiplayer experience.
* A multiplayer server will be automatically built and managed by Odyssey's backend.
* You can enable **Spatial voice & video** for your users to see and hear one another.
* You can use **avatars** if you want a high-fidelity, networked, customizable player pawn.
{% hint style="info" %}
Currently Instant Multiplayer only supports UE version 5.2.1
{% endhint %}
## Enable Instant Multiplayer
1. [Add the Odyssey plugin](/guides/add-the-odyssey-plugin)
2. Enable multiplayer in **Project Settings -> Odyssey -> Multiplayer**
## Select player type
Decide whether you want to use your own player pawn, or ready-to-use avatars for your multiplayer experience.
1. Select your choice in **Project Settings -> Odyssey -> Player Type**.
2. Follow the Odyssey Validator prompts to let it autofix your project and gamemode settings.
## Add Odyssey Multiplayer Player Spawn
Using regular `Player Start` actors in a multiplayer scenario can lead to game breaking issues. Use the `Odyssey Multiplayer Player Spawn` instead to ensure correct networked player spawn behavior.
1. Find the Odyssey Multiplayer Player Spawn in the Place Actors tab.
2. Drag this volume to your level at a place where you want your users to start their experience.
## Build and deploy
To deploy an Instant Multiplayer build, you don't package your build as normal. Instead you upload your full project and let Odyssey's backend compile your client and server targets.
1. Go to the **Odyssey toolbar -> Zip Odyssey Multiplayer.**
2. Select the output directory and wait for the archive process to finish.
3. Upload the generated zip file using the standard web uploader. When prompted for the build type, choose \`Multiplayer\` to ensure your project builds properly.
4. After uploading, our backend will build your client and server targets. This will take a bit of time, roughly 30 minutes for small projects, to an hour for large projects.
{% hint style="info" %}
After uploading your project, and while our backend builds it, it is safe to leave your dashboard or enter other spaces.
{% endhint %}
5. :tada: Once your build is complete and shows `successful` deployment you can make a space, share the link, and have a multiplayer experience!
{% hint style="success" %}
Your server will automatically start when the first user enters, and spin down when the last user leaves.
{% endhint %}
# Spatial voice & video
## Overview
Odyssey has partnered with **Dolby.io** to integrate their spatial communication SDK as a scalable solution for voice, video, and screensharing natively in Odyssey.
Features include:
* **Spatial voice** - user voices attenuate naturally based on distance.
* **Spatial webcams** - webcams appear above users' avatars.
* **Screenshare** - Permission-driven screensharing.
* **Huddle** - non-spatialized voice channel.
* **Text Chat** - when users need to be muted but still send messages.
* **Avatar integration** - avatars will animate speaking during voice activity.
These features are automatically enabled for every multiplayer project without any code or configuration. Each feature can enabled / disabled through the space settings.
# Add spatial comms to player
## When using Avatars
If you're using the Avatar player type, you don't have to do anything. Spatial comms are automatically enabled and set up properly.
## When using custom player type
Spatial comms are automatically registered to your customer player actor at runtime. By default, the location of the spatial webcam is fixed to the top of the bounding box of your player actor. To override this location:
1. Open your player actor blueprint
2. Open the Components tab
3. Click the Add button and select the Odyssey Spatial Comms
4. Adjust the location of the Odyssey Spatial Comms component
# Huddle
Huddle offers an alternative to spatialized comms. It allows users to seamlessly join a global channel, facilitating conversations with individuals in the same virtual space regardless of their location – even while on the loading screen.
## Connecting to huddle
You can connect to a space's huddle at any time by opening the participant menu and selecting the `Join` huddle button.
Join Huddle
You can disconnect from huddle by selecting the `Leave` huddle button located in both the huddle and participant menu.
Active Huddle
{% hint style="info" %}
Connecting to huddle removes you from the spatial audio channel. Huddled users will be unable to communicate with users who are connected to the spatial audio channel.
{% endhint %}
## Huddle invitations
To invite users to huddle, open the participant menu and select the `Invite to Huddle` button found next to the user's name you would like to invite.
You will receive a notification when another user has sent you a huddle invite. Select the `Join Huddle` button to accept the invite or the `Dismiss` button to ignore the invite and close the notification.
Huddle invitation
# Share your screen
Sharing your screen is a feature available while in huddle ([Huddle](/instant-multiplayer/spatial-voice-and-video/huddle)).
* To start a screen share, select the screen share button in the huddle menu and select `Present`.
* Select the tab or window you would like to present and select the `Share` button.
All huddled users will see the active screen share anchored to their screen. When a screen share begins, all users with huddle access will be notified that a screen share is active and can choose to join the huddle by selecting the `Join Huddle` button inside the notification.
# Avatars
## Overview
Odyssey has provided customizable, high-fidelity avatars to use in your project. The avatars are already networked, animated, and do not require any configuration to use.
Features include:
* **Metahuman bodies & clothing** - Diverse set of body and clothing options.
* **Ready Player Me heads** - Users can easily create heads from their likeness.
* **High-fidelity animations** - Naturalistic movements crafted by Odyssey.
* **Loading screen integration** - Users can customize while waiting.
{% hint style="info" %}
Avatars are completely optional. You can also use your own networked player.
{% endhint %}
## Enable Avatars
Enabling Avatars is easy and doesn't require any configuration or code.
1. Open your project. Navigate to **Project Settings -> Odyssey -> Player Type.**
2. Set Player Type to `Odyssey Avatar`.
3. Follow the validation prompts that will correctly set up your project settings.
4. When you ship your project you will now automatically be using Avatars for your player pawn.
# Using Avatars
## Navigation
You can control your avatar using your mouse and keyboard:
**Moving Your Avatar**
* Use the **W, A, S, D** keys for movement.
* Alternatively, you can move by **double left-clicking** anywhere on the ground.
**Running & Walking**
* Toggle between running and walking by pressing **Shift**.
**Camera Control**
* Adjust your camera view by **left-clicking and dragging** to look around.
* Zoom in and out by **scrolling** with your mouse wheel.
### Click to go navigation (optional)
You can also move your avatar by simply double-clicking on the desired location. This feature is particularly useful for users who may not be familiar with traditional gaming controls. To enable this feature, make sure to generate a Recast navmesh in your level:
1. Open the Place Actors tab
2. Find the Navmesh Bounds Volume and drag it to your level
3. Resize the Navmesh Bounds Volume instance to encapsulate all the navigable area
### Movement modes
Additional movement options are available. Currently, we offer three modes:
1. **Normal Mode** (Default): Walking and jogging.
2. **Gaming Mode**: Faster movement, including running and jumping.
3. **Gaming+ Flying Mode**: Sprinting, jumping, and flying.
Customize how avatars move within your space by accessing the space settings.
## Avatar customization
When you enter a space featuring Odyssey avatars for the first time, you'll be prompted to create your own avatar.
You can choose from our pre-made options or click `Customize` to open Ready Player Me, our avatar creation service. There, you can either upload a photo, select a base avatar, and fine-tune your creation. After customization, click 'Next' in the top left corner to save your avatar.
For future changes to your avatar, access the avatar customization menu within the space, and select `Face` to modify your avatar's facial features.
## Clothing customization
Customize your avatar's clothing after loading into a space by clicking on the user menu in the top right corner. Choose 'Customize Avatar' to personalize your top, pants, and shoes, along with your body type and facial features.
## Emotes
Express yourself with Odyssey's avatar emotes. Simply right-click to access the menu and choose from the wheel to share your emotions with those around you.
# Avatar Blueprints
The following blueprints are available if **multiplayer** and **Odyssey Avatars** are enabled.
## Odyssey Avatar Teleporter
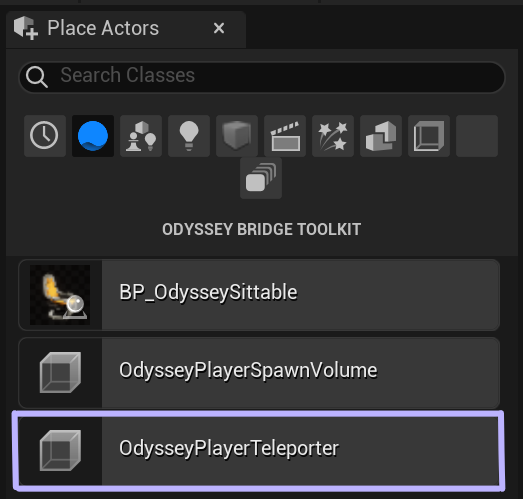
The basic tool to use to integrate the teleporting into a project is by using the`OdysseyPlayerTeleporter`volume class. To set up a teleporter in your level
1. Open the Place Actors tab
2. Find the OdysseyPlayerTeleporter class
3. Drag 2 instances of this actor to your level (let's call these instances A and B)
4. Select instance A and set its Destination property to instance B
5. Select instance B and set its Destination property to instance A
#### Properties
* `Teleport destination`Indicates the destination of the teleport instance. This property can be left empty if the teleport instance is only a destination. This feature can be used to create one-directional teleporters. Multiple instances of the OdysseyPlayerTeleporter can point to a single destination as well.
* `Spawn rotation` indicates the rotation of the avatar after spawning at the teleport instance location.
* OdysseyPlayerTeleporter volume can take any shape.
## Odyssey Sittables
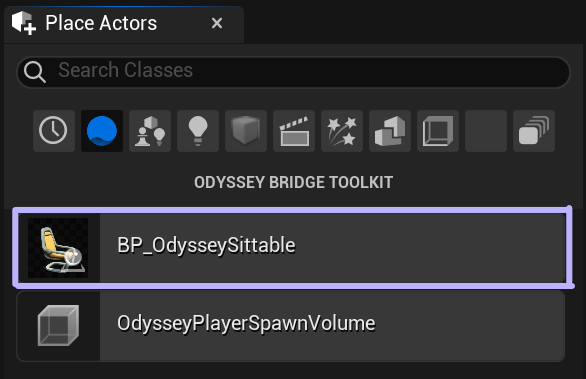
The basic tool to use to integrate the sitting functionality into a project is by using the `BP_OdysseySittable` blueprint actor. To add an Odyssey Sittable to your level:
1. Open the Place Actors tab
2. Find BP\_OdysseySittable
3. Drag it to your level
4. Select the new instance
5. In the actor's Details tab, select the Static Mesh Component
6. Replace the static mesh with a mesh of your choice
> 📘
>
> Static Mesh requirements
>
> * The mesh needs simple collisions built and its Collision Preset set to BlockAll
> * The mesh cannot have Nanite enabled (as this breaks the interact hover effect)
### OdysseySittingSpot component
This component controls how the avatar is attached to the seat.
#### Properties
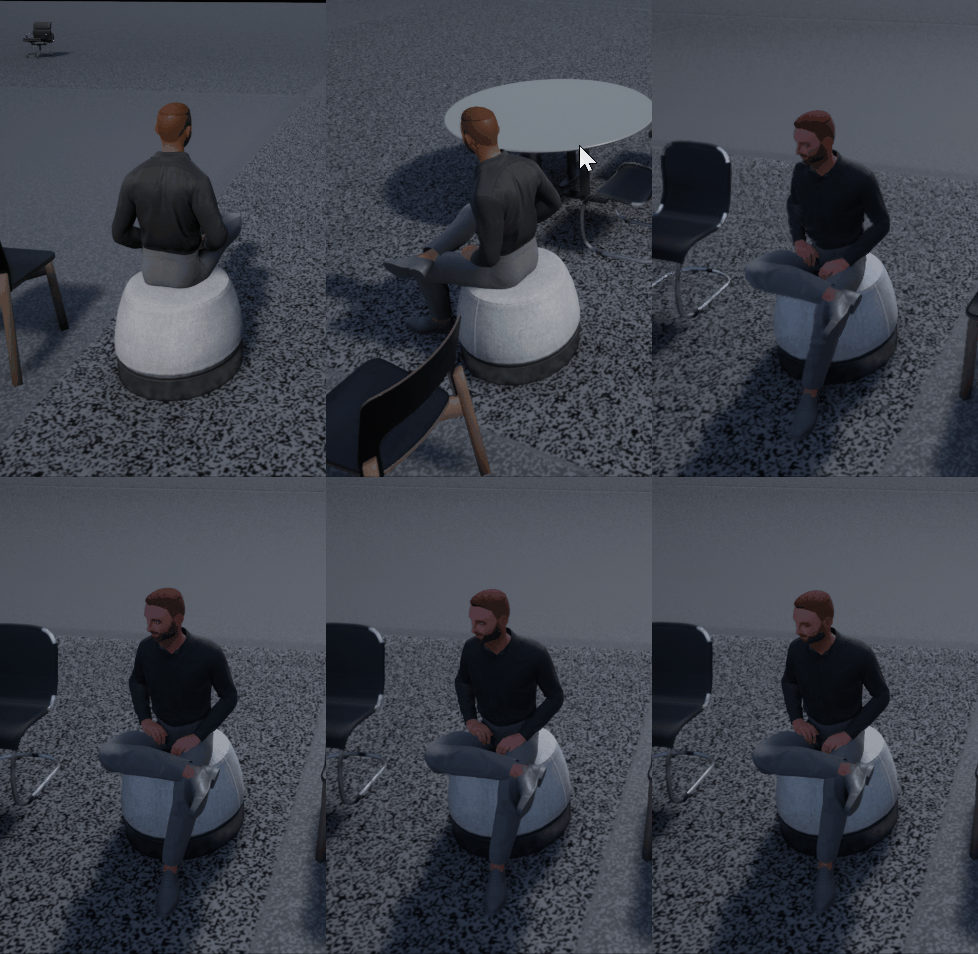
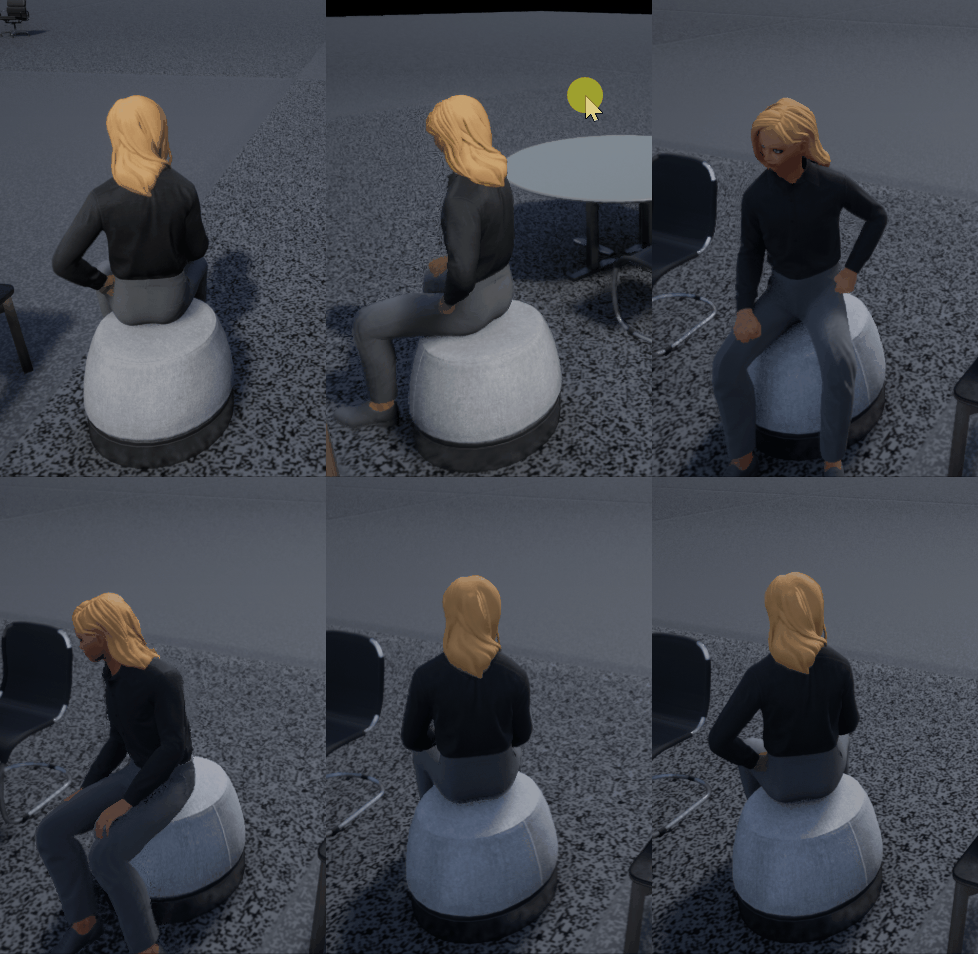
`Allow character rotation`When this property is toggled on, sitting avatar will rotate in place to follow camera direction. When it's off, the sitting avatar will always face the direction indicated by the blue arrow.
Allow character rotation toggled off
Allow character rotation toggled on
# Quickstart
Realtime Configurator overview and quickstart
**Realtime Configurator** is a set of features that allow you or your users to customize your project during runtime in various ways.
Features include:
* **Sketchfab importer -** Import and modify GLTF models from Sketchfab.
* **Actor importer -** Import saved actors from your project.
* **Level & Object Configurator -** Type-based options to modify your level or objects.
* **Media importer -** Create media annotations that open video or web panels.
* **Dolby.io streams -** Create in-world screens that you can push live video feeds to.
{% hint style="info" %}
Realtime Configurator features are backed by a per-space database.
Changes are automatically synced, and networked to multiplayer users.
{% endhint %}
## Enable Realtime Configurator
1. [Add the Odyssey plugin](/guides/add-the-odyssey-plugin)
2. Enable Configurator in **Project Settings -> Odyssey -> Configurator**
3. Open the main level of your project, and in the Place Actor panel (**Window -> Place Actor**), drag the `Odyssey Configurator` actor into your level.
4. :tada:Save your level, and deploy your project as normal.
{% hint style="success" %}
Once enabled your project will automatically have **GLTF importer**, **Media importer**, and I**n-world streams**.
{% endhint %}
# Sketchfab importer
Odyssey has integrated [Sketchfab](https://sketchfab.com/feed) natively into its Realtime Configurator toolset. You can use this integration to search and import 3D GLTF models from Sketchfab's library.
You can also log into your Sketchfab account and import your own models or saved collections.
## Enable Sketchfab importer
Once you have followed the steps on [Quickstart](/realtime-configurator/quickstart) you can use the Sketchfab importer from within your project spaces.
# Actor importer
**Actor Importer** allows you define a library of blueprint actors from within your project that you can then import and place in your level during runtime.
## Enable Actor Importer
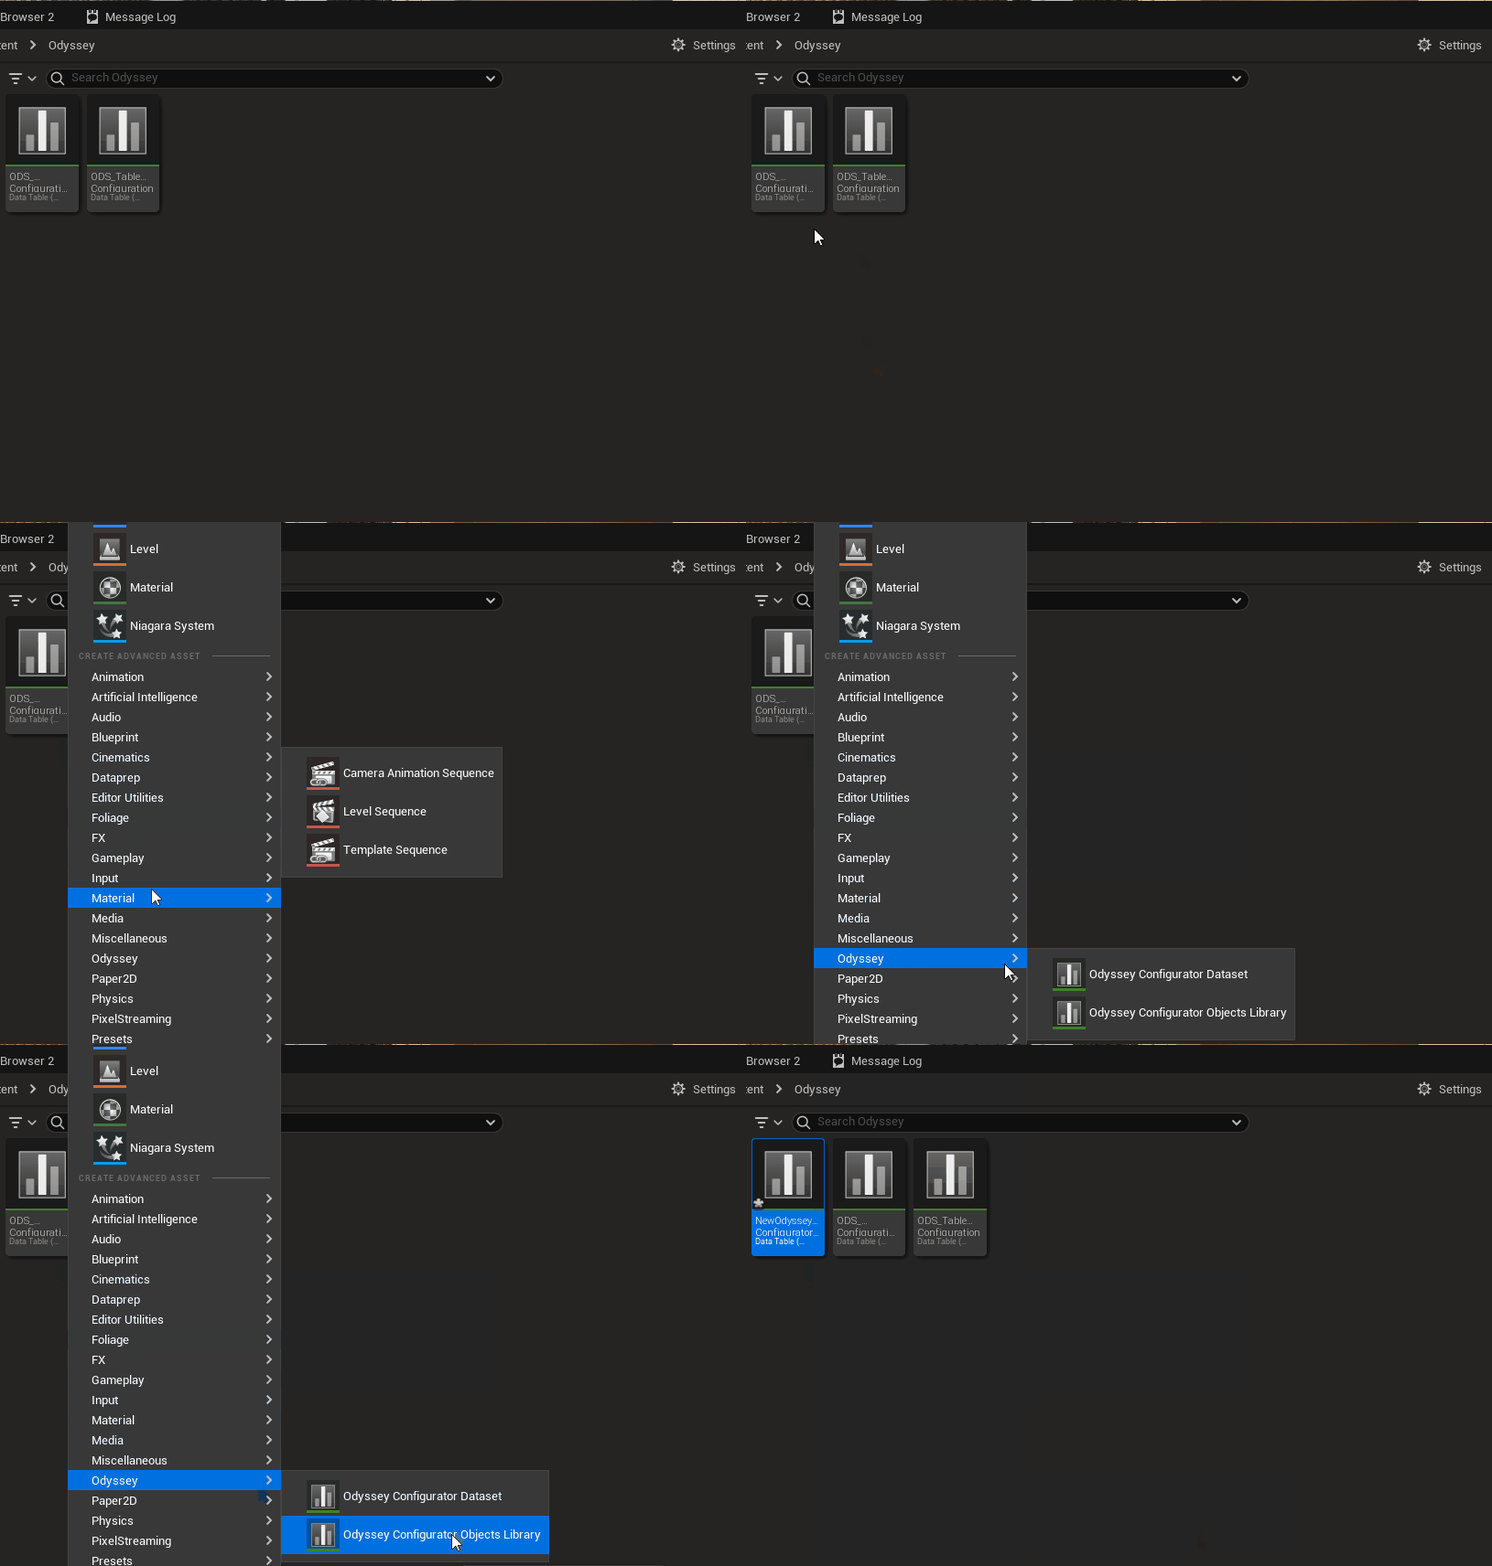
1. Create a new `Odyssey Configurator Objects Library` asset in your Content Browser.
2. Find the `OdysseyConfiguratorRegistryActor` instance in your main level (added in [Quickstart](/realtime-configurator/quickstart)). In the Details panel, under **Odyssey -> Configurator Objects Library,** add your Configurator Objects Library asset.
## Add an actor to your objects library
1. To create a new importable actor, create a new blueprint of class `OdysseyConfigurable.`
2. You can also reparent an existing blueprint class to `OdysseyConfigurable`.
{% hint style="warning" %}
Make sure the pivot of your custom actor is in the middle of its bounds, otherwise the runtime import drag functionality will break.
{% endhint %}
1. Open your `Odyssey Configurator Objects Library` asset.
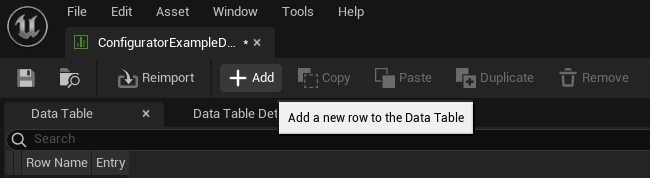
2. Add new row (with the following `+Add` button) and select it:
7. Fill the row data:
1. Set `Configurable Actor Class` to your actor blueprint.
2. Set `Thumb` to a public image URL you want to show in the menu.
3. Set `Display Name` to the name you want to show in the menu.
8. :tada:You'll now see your actor when you navigate to your Realtime Configurator menu in your project space.
# Level & object configurator
**Level & Object Configurator** allows you to build type-based configurations for you or your users to modify your project during runtime.
* Configurations will generate UI in the Realtime Configurator panel.
* Configurations are automatically networked and persistent.
The following configuration types are available:
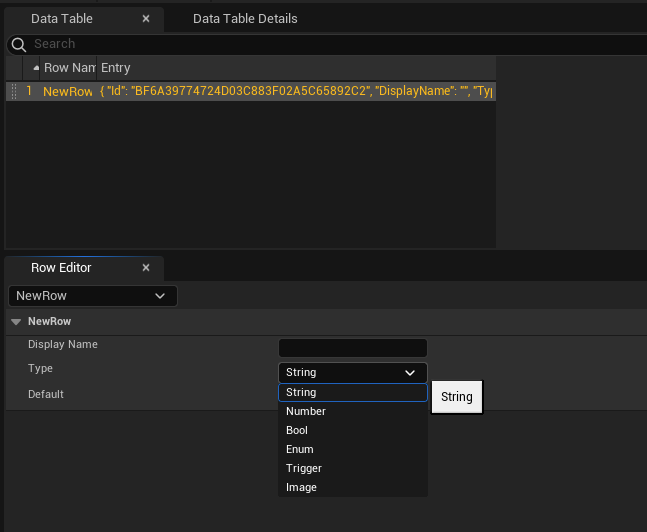
Type
Description
Generated UI
String
General text value
Text input
Number
Float value
Number input
Boolean
True or false value
Toggle switch
Enum
Set of pre-defined values
Dropdown menu
Trigger
A single event
Button
Image
Image URL for textures
Image picker that creates URL
{% hint style="info" %}
Configurations are created via blueprint, and can be added to the level itself, or on your imported Actors (set up in [Actor importer](/realtime-configurator/actor-importer)).
{% endhint %}
# Level configurator
**Level Configurations** are a way for you to add configuration data globally to your main level*.* The defined configuration UI will show up in your actor menu after being placed.
## Create a configurator dataset
1. In your project's content browser, right click and go to Odyssey -> Odyssey Configurator Dataset
2. Find the `OdysseyConfiguratorRegistryActor` instance in your main level (added in [Quickstart](/realtime-configurator/quickstart)). In the Details panel, under **Odyssey -> Configurator Dataset,** add your Configurator Dataset asset.
3. You can now start adding level configurations to your dataset
## Create a configuration property
1. Open your Configurator Dataset asset.
2. Add a Configurator key to the Dataset using the Add button:
3. Fill your configuration data in your newly created row. Each configuration needs a **Display Name, Type,** and a **Default Value.**
## Add configuration logic
{% hint style="info" %}
The following blueprint setup is done within a level blueprint for clarity, but you can use any blueprint class.
{% endhint %}
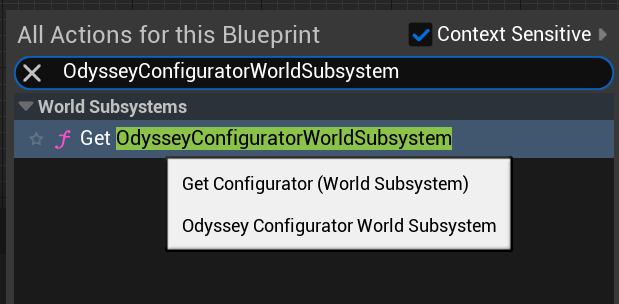
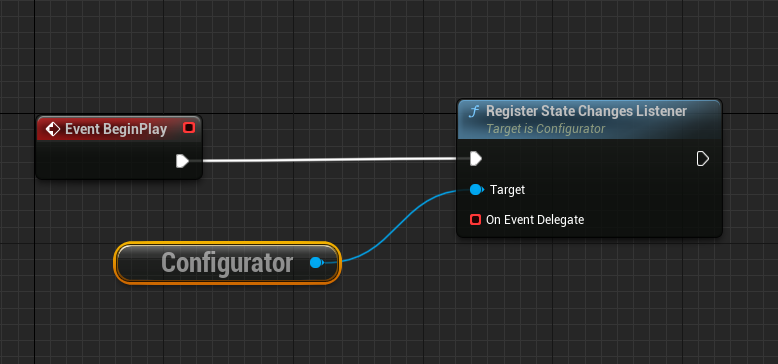
1. Inside your level blueprint, on **BeginPlay**, grab reference to the **OdysseyConfiguratorWorldSubsystem**:
2. Off of the new Configurator node, create a **Register State Changes Listener** and connect it to your Event BeginPlay:
Register state change events from your configurator
3. Create an event delegate binding by dragging out from the **On Event Delegate** pin. Select 'Add Custom Event' when prompted.
4. rom this point you can follow the guide [Configurator blueprint API](/realtime-configurator/level-and-object-configurator/configurator-blueprint-api) to learn how to set up events and hooks from your configurator properties.
# Object configurator
**Object Configurations** are a way for you to add configuration data *per Imported Actor.* The defined configuration UI will show up in your actor menu after being placed.
{% hint style="warning" %}
Make sure you have set up your **Object Library** and at least one **Imported Actor** by following the instructions in [Actor importer](/realtime-configurator/actor-importer).
{% endhint %}
## Create a configurator dataset
1. In your project's content browser, right click and go to **Odyssey -> Odyssey Configurator Dataset.** Name it after your Imported Actor.
2. Open your `Odyssey Configurator Objects Library` asset (created in [Actor importer](/realtime-configurator/actor-importer)).
3. In the row that holds your object, under **Configurator Dataset ->** Add your newly created configurator dataset.
{% hint style="info" %}
You will need to follow these steps for every Imported Actor you want to attach configuration properties to.
{% endhint %}
## Create a configuration property
1. Open your Configurator Dataset asset.
2. Add a Configurator key to the Dataset using the Add button:
3. Fill your configuration data in your newly created row. Each configuration needs a **Display Name, Type,** and a **Default Value.**
## Add configuration logic
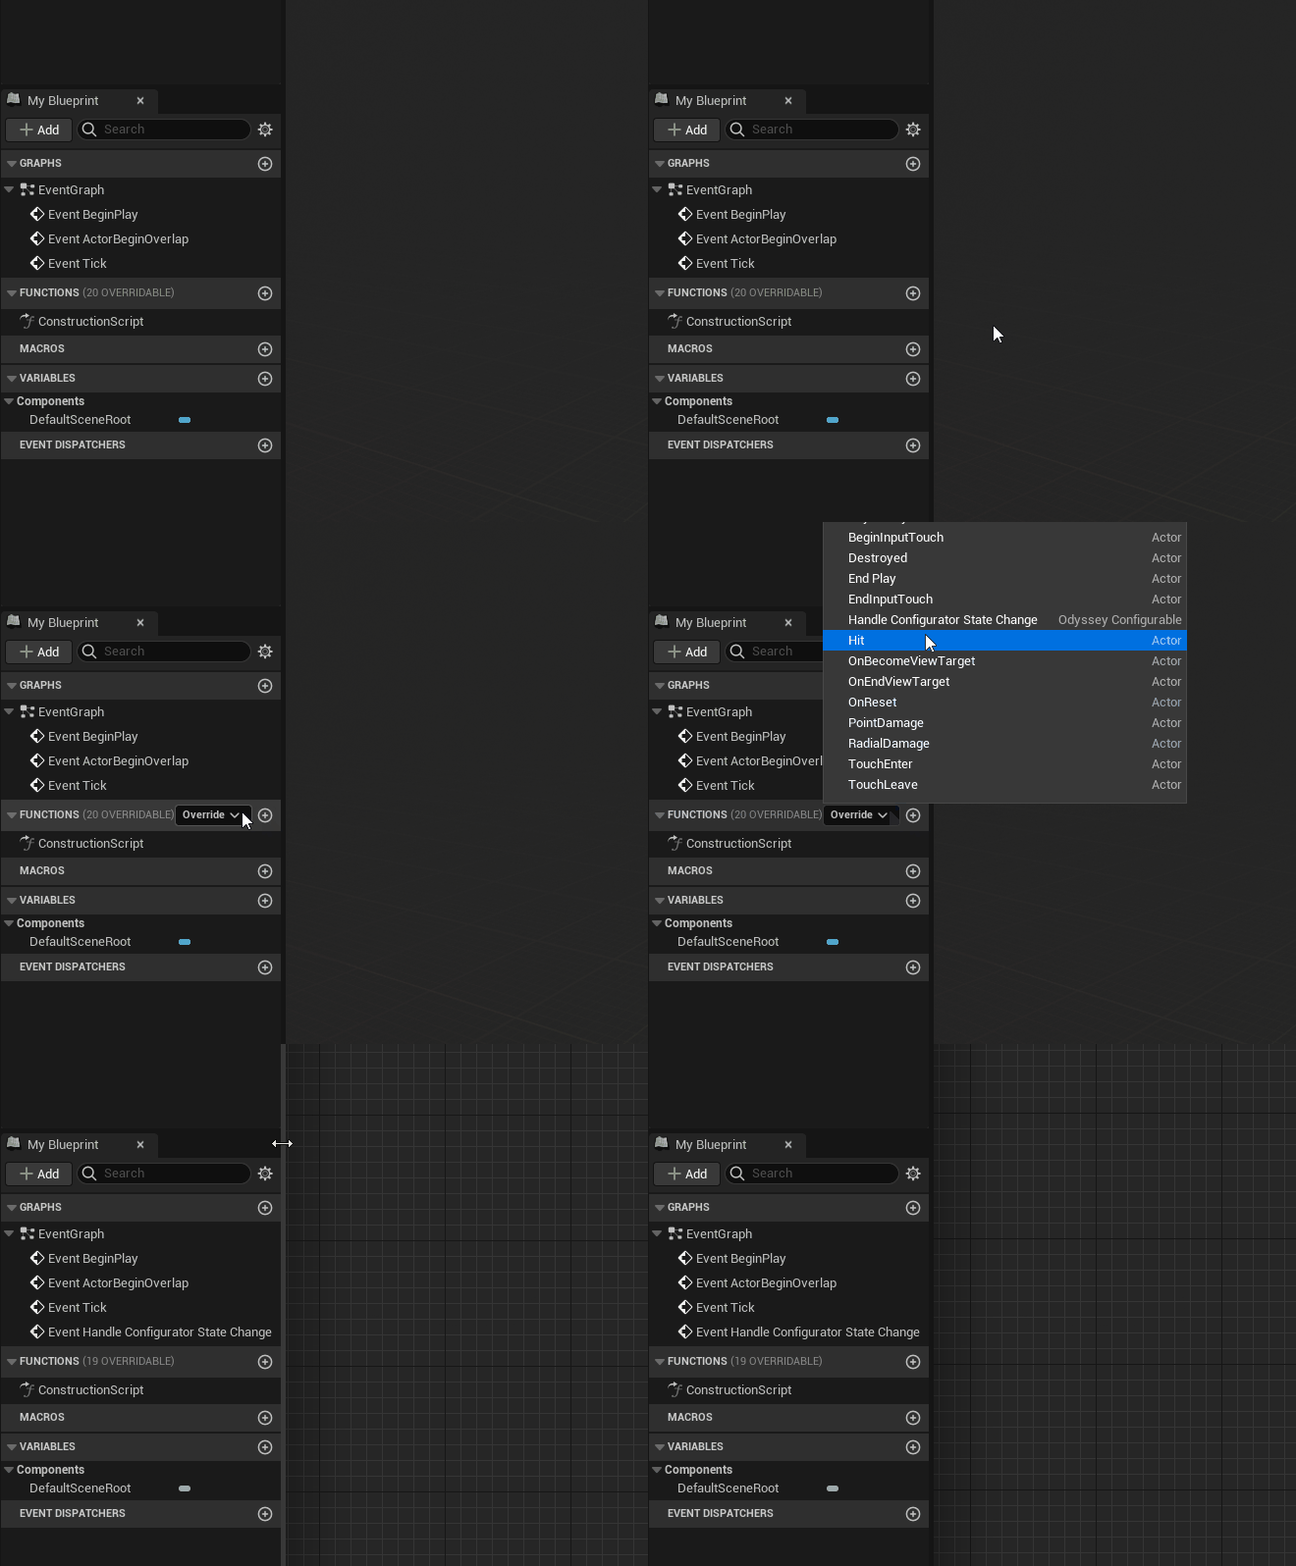
1. Open your **Imported Actor** blueprint (type `OdysseyConfigurable`).
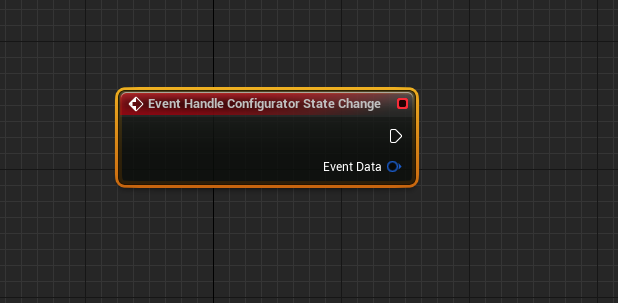
2. Override the `Handle Configuration State Change` function
3. Connect your custom configuration logic to the exec pin of the newly created event.
4. From this point you can follow the guide [Configurator blueprint API](/realtime-configurator/level-and-object-configurator/configurator-blueprint-api) to learn how to set up events and hooks from your configurator properties.
# Configurator blueprint API
## Overview
This example walks through the steps of binding runtime gameplay logic to Level or Object Configurator events.
{% hint style="info" %}
Make sure you have set up your blueprint to start receiving events, from within your [level configurat](/realtime-configurator/level-and-object-configurator/level-configurator)[or](/realtime-configurator/level-and-object-configurator/level-configurator) or your [object configurator](/realtime-configurator/level-and-object-configurator/object-configurator).
{% endhint %}
## Switch on configurator key
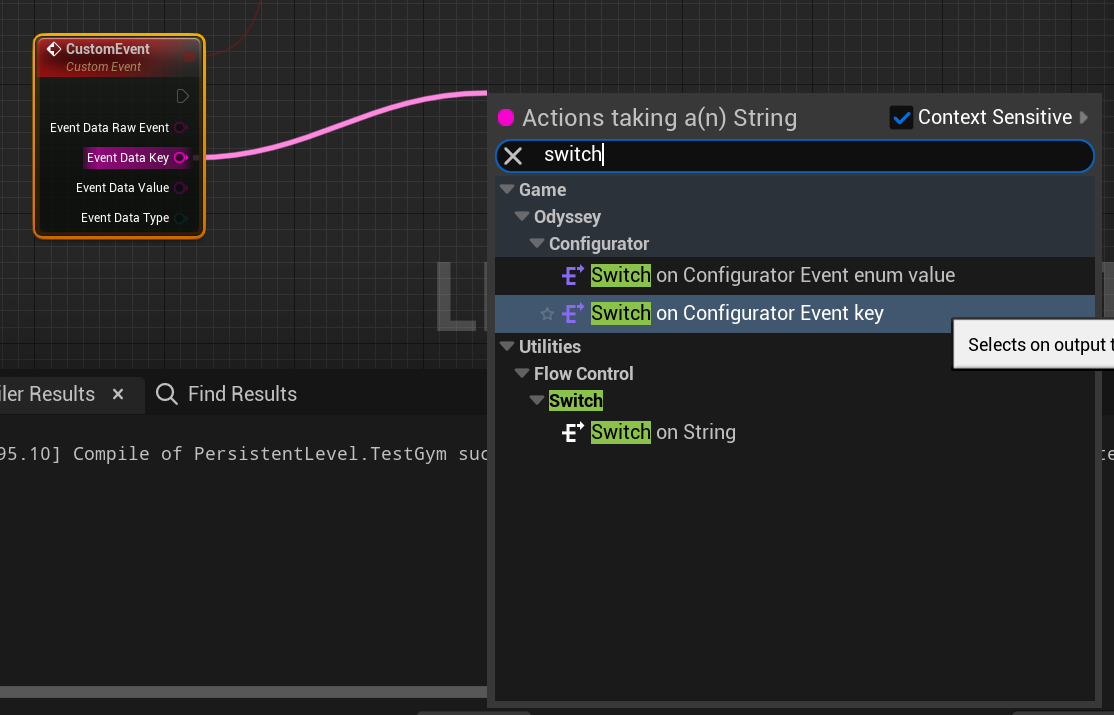
In most cases you'll want to set up a **Switch on Configurator Key** node to separate logic based on the specific property you are targeting.
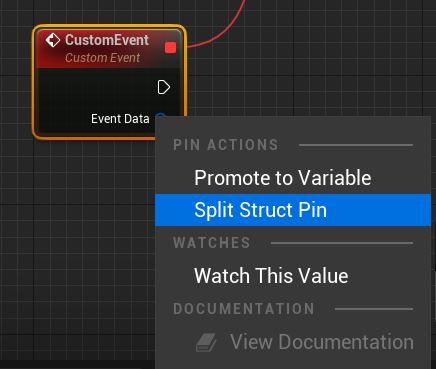
1. Right click on the event node and select **Split Struct Pin:**
2. Drag out of Event Data Key and select **Switch on Configurator Event Key**:
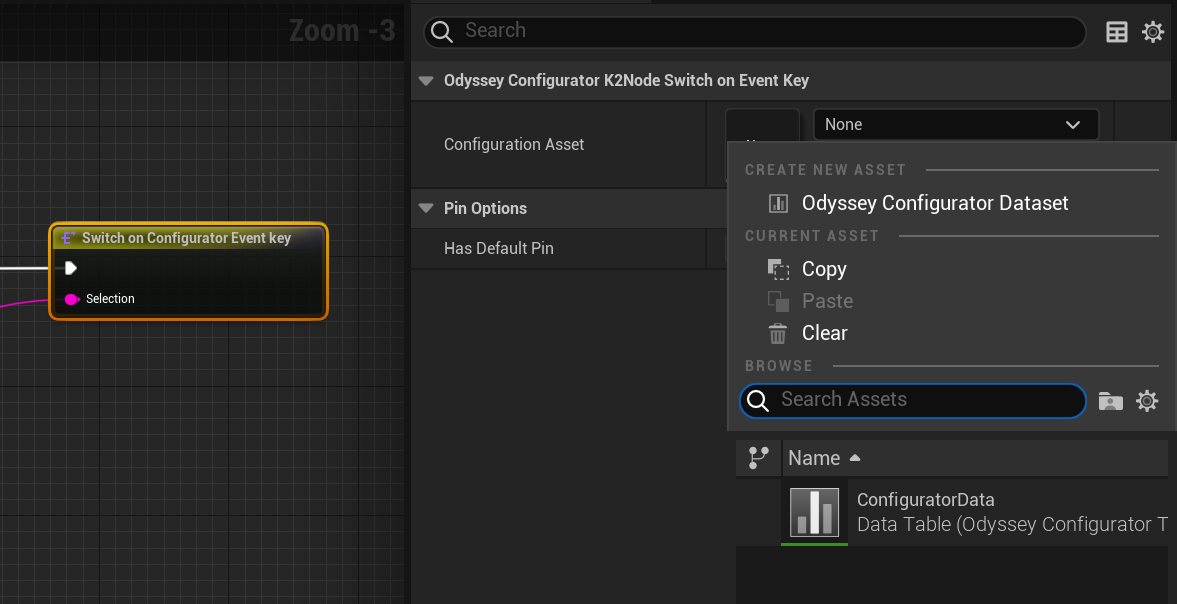
3. Select the new node and in it's options assign the correct **Configurator Dataset** asset to it:
4. Your **Switch on Key** node should now be populated with the correct properties.
## Acting on configuration event data
Depending on your property type you have different options for acting on the configuration event data (flowing from the **Event Data** pin).
### Strings and numbers
In the case of strings and numbers, the Event Data Value can be passed directly to the consuming node:
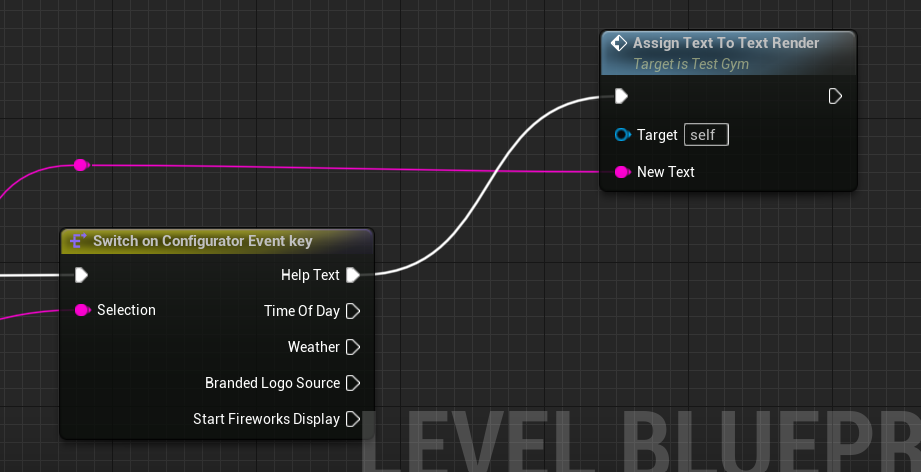
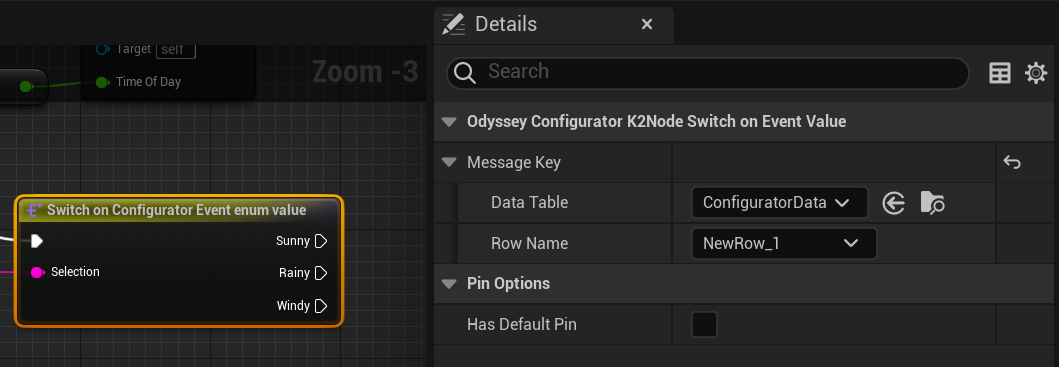
### Enums and booleans
Enum and booleans Configurator values are easy to work with thanks to the **Switch on Configurator enum value** node. Once added, specify the correct Key in its node settings:
### Images
1. Reacting to an Image event type is easy. The Event Data Value can be linked to a **Get Image From URL** node.
2. The bound delegate will fire once the file is downloaded and turned into a runtime texture:
### Triggers
Trigger events do not carry any value, and can be used to fire non-parametrized events. Simply drag off the **Switch on Key** node to listen for Trigger events.
# Media importer
**Media Importer** allows you or your users to add persistent media annotations throughout your level during runtime.
This can be useful for quickly adding native web-based panels to your project (like websites or video content) without having to ship these within Unreal Engine.
## Enable Media importer
Once you have followed the steps on [Quickstart](/realtime-configurator/quickstart) you can use the Media importer from within your project spaces.
# Vimeo & web panels
## Add a web panel
To add a web panel annotation to your space, open the **Realtime Configurator panel -> Add Media -> Link Media.**
Make sure the website you are attempting to link to can be iframe-able.
## Add a vimeo panel
To add a vimeo panel annotation to your space, open the **Realtime Configurator panel -> Add Media -> Video.**
# Dolby.io in-world streams
{% hint style="info" %}
This feature is only available for **Enterprise** customers for multiplayer projects
{% endhint %}
`Streams` are in-world screens that display a live stream media source running through Dolby.io streaming service. Dolby.io streams provides sub-second latency, broadcast-quality color and sound, and end-to-end encryption.
## Adding a stream
1. Once in a space open your media importer panel and select the `Stream` option.
2. Then click `Add stream`.
3. Once placed you can modify it's properties to change various behavior like volume, attenuation, and visual appearance.
## Screenshare to your stream
1. The easiest way to push content to your `stream` items is through in-app screensharing.
2. You can screenshare while in a `huddle` session. While in `huddle` and screensharing, click the `Cast to 3D screens` button - this will push your screenshare to your stream items.
3. Read more about [Huddle](/instant-multiplayer/spatial-voice-and-video/huddle).
{% hint style="warning" %}
Currently, you are unable to share your audio while using this feature.
{% endhint %}
## Streaming from OBS
{% embed url="" %}
OBS is a good approach if you have a more complex broadcast requirement that you can't achieve with a simple screen-share. To use OBS, you'll need to download a custom OBS fork: "OBS on WebRTC" [HERE](https://github.com/CoSMoSoftware/OBS-studio-webrtc/releases).
1. To begin, download and install the OBS-WebRTC client to your PC or Mac. Then go to the OBS settings panel and click to open it.
2. From the "Controls" menu click on the `Settings` button which will open the Settings panel. From here, click on the "Stream" option. Then from the "Stream Type" dropdown, select "Millicast WebRTC Streaming Platform".
3. Fill out the `Stream Name` and `Publishing Token` with the info from Space Settings.
4. **Change the Codec to VP9**.
5. Hit the `Start Streaming` button and you should be pushing out your source live.
## Seeing your stream
Once you've started a stream from one of your sources, you'll see it render automatically to your screens in-world. You don't have to do anything else to turn them on in-world. When you want to stop the screens playing, simply stop the source you chose.
# Enable embedding
Add Odyssey into your existing web stack as an iframe
## Overview
You can embed your Odyssey experience in another website using an [*iframe*](https://developer.mozilla.org/en-US/docs/Web/HTML/Element/iframe)*.*
## Enable embedding
1. Find your space in the dashboard and select it
1. OR if you're already on your space page, click the Odyssey icon in the top-left
2. *Settings* -> *Sharing*
3. *Publish Space ->* Enable
4. *Allow embeds ->* Enable
5. Click *Copy embed link*
{% hint style="info" %}
Turning on embedding will automatically disable Odyssey Authentication.
{% endhint %}
### Adding the iframe
To embed Odyssey, integrate the subsequent iframe tag into your website's HTML code, employing the copied URL as the source for the iframe.
```html
```
# Pass messages to and from Unreal
Your browser application can send and receive messages to Unreal Engine over the Pixel Streaming WebRTC datachannel through Odyssey.
Odyssey provides a message channel, using the MessageChannel API
## Setting up a `MessageChannel`
In order to send and receive native pixel stream messages, you'll need to create a `MessageChannel` on your iframe.
The following code sets up a secure communication channel between the parent window and Odyssey (app.odyssey.stream) using the MessageChannel API.
A new `MessageChannel` instance is created when the iframe has reached a loaded state, providing two bidirectional ports: `port1` and `port2`.
The initial action is taken by the parent window, which subscribes to `port2` and then transfers `port1` to Odyssey. Odyssey will acknowledges and validates this message, replying with an `odyssey ready` message. Once this connection is established, both the parent window and Odyssey gain the capability to exchange messages in both directions.
```javascript
const iframe = document.querySelector('iframe') as HTMLIFrameElement
iframe.addEventListener('load', onLoad)
const channel = new MessageChannel() as MessageChannel
function onLoad() {
if (!iframe || !iframe.contentWindow) {
console.error('Iframe not found.')
return
}
// listen for messages on port2
channel.port2.onmessage = onMessage
// send setup channel message to odyssey
iframe.contentWindow.postMessage({ type: 'setupChannel' }, 'https://app.odyssey.stream/', [channel.port1])
}
function onMessage(event: Event) {
// add custom logic to react to messages from Odyssey
console.log('Message received from iframe: ', event.data)
}
```
# Sending messages to Unreal
## Overview
In this step-by-step guide, we implement a gameplay feature where a colored cube gets spawned in front of the player whenever we receive a Pixel Streaming message. This simple interaction showcases the seamless integration between your webpage and Unreal project.
## Sending messages from webpage
Once a connection between your webpage and the Odyssey iframe has been established, you will be able to send Pixel Streaming messages to Odyssey using the function:
```javascript
function sendPixelStreamMessage(psKey: string, psValue: any) {
// stringify and send data
if (channel ) {
const data = { type: 'ps', psKey, psValue }
const jsonString = JSON.stringify(data)
channel.port2.postMessage(jsonString)
} else {
console.error('Message channel not established.')
}
}
```
### Example payload
```json
{
"type": "ps",
"psKey": "SpawnCube",
"psValue": "0.863,0.208,0.271"
}
```
## Receiving Pixel Streaming messages in UE
*Documentation coming soon...*
# Receiving messages from Unreal
## Sending messages from Unreal
*Documentation coming soon...*
## Receiving messages on webpage
Pixel stream messages from Unreal Engine will be transmitted utilizing the MessageChannel API. Parse the message string to facilitate data extraction. Each message will contain two properties: `type`, which is consistently set to `ps`, and `message`, encapsulating the data that has been received from Unreal Engine.
```typescript
function onMessage(event: Event) {
const data = JSON.parse(event.data)
// handle pixel streaming message
if (data.type === 'ps') {
const psMessage = data.message
}
}
```
# Manage your stream
Odyssey provides various ways of controlling your stream or collecting data through the embed API.
# Stream loading states
## Overview
If you wish to know more about the stream loading state, or even build your own loading UI, you can watch for MessageChannel event payloads with `type == "stream-loading-state"`. Each will contain a `value` field with one of the following values:
*Note: Percentage is provided to help indicate how far through the loading process each state is*
* `play-button-clicked` - If you are using our loading screen, the user has selected the "Join" button
* `received-video-frames` - Stream has received at least 60 frames or 1MB of video data - 110%
* `ready` - Pixel stream player is ready and playing - 100%
* `webrtc-connected` - WebRTC is connected to the Unreal Engine game client - 90%
* `webrtc-connecting` - WebRTC is connecting to the Unreal Engine game client - 75%
* `unreal-client-started` - Unreal Engine game client has started - 50%
* `waiting-for-compute` - Waiting for a compute node on which to run the Unreal Engine game client - 25%
### Additional Info
There's also the `additionalInfo` field which is a map of extra contextual information. Here's the possible values:
* `isRefresh: boolean`- Informs whether this state change occurred as part of a browser refresh or not.
## Example payload
```json
{
"type": "stream-loading-state",
"value": "ready"
"additionalInfo": {
"isRefresh": false
}
}
```
# Session states
## Overview
If you want to learn more about the local session status you can watch for MessageChannel event payloads with `type == "session-state"`.
This can be particularly useful when developing your own user interface and seeking information about user-related events, such as a user's AFK status or when a user reaches the maximum session length. Each will contain a `value` field with one of the following values:
* `afk-warning` - A user has been idle, and if no activity is detected within the next 2 minutes, they will be removed
* `afk-reset` - Activity detected from an idle user; the AFK timer has been reset
* `afk-closing` - The user has been idle for an extended period and will be removed from the space immediately
* `max-session-reached` - The user has reached the maximum session duration and will be removed from the space immediately
## Example payload
```json
{
"type": "session-state",
"value": "max-session-reached"
}
```
# Stream quality settings
## Overview
Manage and retrieve pixel stream configuration settings to tailor your application's performance.
To set custom quality settings, send a message with `type === "set-stream-settings"`, and a `value` property to the desired setting.
To retrieve the current configuration, send a message with `type === "get-stream-settings"` which will return a JSON object containing all current stream configurations.
{% hint style="warning" %}
Updates to the stream's configuration can only be made once you have received the `ready` loading state
{% endhint %}
## Available quality settings
Here are the available quality settings that can be modified:
* `MinQP` - the lower bound for QP when encoding. By default the `MinQP` is 1 meaning the encoder is free to aim for the best quality it can on the given network. Valid values are 1-51 where:
* 1 = best quality but highest bitrate
* 51 = worst quality but lowest bitrate
* `MaxQP` - the upper bound for QP when encoding. By default the `MaxQP` is 51 meaning the encoder is free to drop quality as low as needed on the given network. Valid values are 1-51 where:
* 1 = best quality but highest bitrate
* 51 = worst quality but lowest bitrate
* `WebRTCMinBitrate` - the minimum desired WebRTC bitrate. Note that poor network connections may experience issues if this value is set too high.
* `WebRTCMaxBitrate` - the maximum desired WebRTC bitrate. Note that setting this too low could result in a blocky video.
* `WebRTCFPS` - the maximum stream fps.
## Example functions
```typescript
type QualitySettings = {
MinQP?: number
MaxQP?: number
WebRTCMinBitrate?: number
WebRTCMaxBitrate?: number
WebRTCFPS?: number
}
// update stream settings
setStreamQualitySettings(updatedSettings: QualitySettings) {
// define and send message
const data = {
type: "set-stream-settings",
value: updatedSettings,
}
const jsonString = JSON.stringify(data)
channel.port2.postMessage(jsonString)
}
// retrieve stream settings
getStreamQualitySettings() {
// define and send message
const getQualityMessage = {type: "get-stream-settings"}
const jsonString = JSON.stringify(data)
channel.port2.postMessage(jsonString)
}
```
# Dynamic styling
## Overview
Update the CSS of Odyssey UI elements using Odyssey's MessageChannel API. Simply provide a selector string to the desired element, accompanied by an array of styling changes to be applied. Using this powerful feature you can rebrand tooltips, move collaboration UI to different locations, change the mouse cursor, and customize the look and feel of Odyssey to however you like.
To apply custom styling, initiate a message with `type === "update-document-style"`. Include a data property with `elementSelector` specifying the target element by its string identifier. Additionally, provide a `styleUpdates` array, containing objects with both a `property` and `value` field. `property` defines the CSS property to modify and `value` indicates the desired styling value.
## Example payloads
### Update cursor
```json
{
"type": "update-document-style",
"data": {
"elementSelector": "#player",
"styleUpdates": [
{"property": "cursor", "value": "pointer"},
]
}
}
```
### Update button background and text color
# Sharing and permissions
Odyssey comes with fine-grained permission controls of your spaces.
## Share a space with your organization
Anyone that is a `member` of your current organization will be able to see any space you create within that organization.
The permission of these users depends on their organization role. `admins` and `editors` have `can edit` permissions on spaces, while `viewers` only have `can view` permissions.
## Share a space with one person
You can invite people outside your organization by opening the `Share` menu.
When in a space, go to `Share` button at the top right.
Enter the person's email address in the space provided, choose a level of access from the dropdown (i.e. can view, can edit), and click Invite.
Space invite - email
## Share a space with the web
To make your space visible to anyone that has the link, you can turn on `Publish space`.
Anyone that joins through the `Publish space` method will have `can view` permissions. If you want any of these users to have edit access, you can invite them individually.
Publish space
## Using Odyssey Authentication
By default, published spaces have **Odyssey's Authentication** enabled. This allows you to more easily track who is entering your space by having users sign in with their email.
You disable this, and users will be able to enter your space immediately.
When embedding is turned on this is also automatically disabled.
Allow anonymous sign in
{% hint style="success" %}
When using Odyssey Authentication users only sign-in one time, and then will be automatically signed-in on all future visits to your content.
{% endhint %}
## Permissions
Permissions on spaces are easy to understand. All users have one of two permissions:
* `can edit`: The user is able to add or edit content in the space.
* `can view`: The user cannot edit any content in the space.
# Subscriptions
Odyssey has three subscription tiers. Each subscription tier gives you access to purchase stream credits, deploy any number of projects, and more.
## Plan comparison
## Manage your subscription
{% hint style="info" %}
To sign up for a subscription follow the steps on [Getting Started](/upload-a-project/getting-started)
{% endhint %}
Once you have an active subscription, open your [organization dashboard](https://app.odyssey.stream/), then:
1. Select *Organization Settings* from the left-side navigation menu
2. Select the *Billing* tab
3. Choose the plan you want:
## Cancellation
You can always downgrade to Sandbox and you won't be charged any monthly amount. If you want to cancel your subscription completely you can click on the `Manage in Stripe` button at the top of the Billing page.
From the Stripe dashboard you can cancel your account completely.
# Purchase stream hours
Odyssey has an easy **pay-as-you-use** pricing model**.** Buy stream hours upfront and they drain on per-minute basis as users stream your content.
**Stream hours are $3 /hr across all our GPUs.**
> *Current pricing is experimental and subject to change.*
## Purchase stream hours
To purchase stream hours you have to have an active subscription. Read how to set up your account here: [Getting Started](/upload-a-project/getting-started)
When you complete your subscription you are given two free stream hours. Pro and Enterprise subscriptions have these two hours refill each month.
To add more hours go to your admin dashboard, then on the left-side click on the following button:

You'll be sent to a Stripe payment page to complete your purchase. Once you have completed payment, your new hours will show up within 30 seconds.
# Our GPUs (Coreweave)
Odyssey powers all Unreal Engine experiences using [Coreweave's](https://coreweave.com/) GPUs.
Odyssey makes available three different GPUs from Coreweave:
GPU
Equivalent to
Availability
Subscription Required
RTX_A6000
RTX 3080
Medium (hundreds)
Pro or Enterprise
RTX_A5000
RTX 3070
High (up to 1000)
Pro or Enterprise
RTX_A4000
RTX 3060
Very High (thousands)
Any
If your UE project has reduced hardware requirements, there are weaker/cheaper GPUs that we can make available to you. Be in in touch through [Discord](https://discord.com/channels/926957916089634836/1093581069116244071) to discuss further.
## Regions
Odyssey's Coreweave GPUs are available in two regions, each with similar capacity volumes:
* US Central
* US West
# Concurrent user limits
Odyssey is built for dynamic scaling of Unreal pixel streaming sessions, where **1000+ concurrent users** could join your session in an instant.
## Expecting more than 1000+ CCU?
If you have an event or experience planned, from which you expect greater than one thousand concurrent users, please be in touch via [Discord](https://discord.com/channels/926957916089634836/1093581069116244071).
## Space Limits & Sharding
Spaces, by default, are limited to 35 concurrent users.
If you want to increase this, you can enable the *Allow Sharding* space setting. This removes any limit on how many concurrent users your space can support.
### What is a *shard*?
A shard is like a sub-space for multiplayer projects. Shards have their own game-servers but share space settings (like configuration, permissions, and Dolby.io streams).
Users on one shard will only be able to interact other users on the same shard, but will see any updates pushed to the space - like configuration updates.
# Vulkan renderer
Odyssey ships all projects using Linux, which uses the Vulkan renderer. Currently Vulkan has some limitations that can either cause stability issues, or visual differences from Windows.
{% hint style="info" %}
Epic is committed to fixing these issues and bringing Vulkan inline with directX on the 5.4 release.
{% endhint %}
## Known issues
* **Hardware Raytracing** is not supported.
* **DLSS** is not supported.
* **SM6** features are not supported.
* **Panning textures** are not supported.
* **Virtual shadow maps** can occasionally have visual issues.
* **Nanite double-sided foliage** renders incorrectly.
## Testing Vulkan locally
It's helpful at times to test Vulkan locally if you are debugging certain visual issues.
You can achieve this by packaging your project locally and running with `-Vulkan` argument.
1. Enable SM5 in Project Settings -> Platforms - Windows -> Vulkan Targeted Shader Formats.
2. Package your project.
3. Run your project through a command line with the `-Vulkan` argument.
# In-world video support on Linux
### Bink
Bink videos are fully supported on Linux, but their audio is not spatialized by default. Please reference the official Epic documentation to learn more about using Bink in Unreal:
If you'd like to use the Bink format and have your audio spatialized, consider implementing your own AV sync logic to play the video and the audio at the same time and keep them in sync.
### WebM
As of Unreal Engine 5.2.1, WebM videos are not supported on due to an engine crash.
# Add the Odyssey plugin
## Add Odyssey plugin to your Unreal Engine version
### Windows
1. Download the [Odyssey UE Plugins installer](https://storage.googleapis.com/odyssey-bridge-binaries/odyssey-ue-plugin-installer.exe)
2. Open the installer
3. Locate the Epic Games directory on your machine and select the desired Unreal Engine version for installing Odyssey plugins
Unreal is commonly installed in the Program Files directory
4. Click through the install process (Next -> Install)
{% hint style="info" %}
Ensure you are connected to the internet before proceeding, as the plugins require an internet connection for installation
{% endhint %}
5. Allow the installer to complete the download and extraction of the plugins
6. Click Finish to close the installer
### Linux
1. Download the [Odyssey UE Plugins zip](https://storage.googleapis.com/odyssey-bridge-binaries/OdysseyUEPlugins.zip)
2. Go to your Unreal Engine install directory
3. Navigate to Engine -> Plugins -> Marketplace and paste the OdysseyUEPlugins.zip file there
4. Unzip the archive (right click -> Extract all... -> Extract)
## Enable the Odyssey plugin in your project
1. Open your Unreal Engine project
2. Go to Edit -> Plugins
3. Search for Odyssey, and enable the Odyssey plugin
4. Follow the prompt to restart the editor
5. When the editor starts again, accept the `Update your project` prompt
# Validate your project settings
The **Odyssey Validator** is an editor utility that helps you successfully deploy your project when using features like [Instant Multiplayer](/instant-multiplayer/quickstart)or [Realtime Configurator](/realtime-configurator/quickstart).
It tracks your project settings for correct implementation, and suggests auto-fixes when an issue arises.
{% hint style="info" %}
Run the validator each time before you prepare your project package. It will help you catch issues that could result in packaging or runtime errors.
{% endhint %}
## Running the validator
The Odyssey validator will run for you in the background to check your project settings as you make changes. You can also run it manually through the **Odyssey toolbar -> Validate Odyssey Configuration**.
## Letting the validator auto-fix issues
As you begin using Odyssey features like [Realtime Configurator](/realtime-configurator/quickstart) or [Instant Multiplayer](/instant-multiplayer/quickstart), the validator will step in to help you.
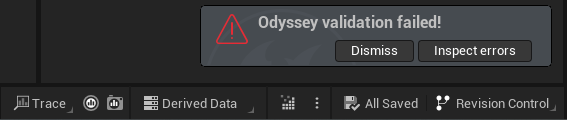
After enabling one of these features in your project, you will see the validator notifying you that there are settings that need to be changed:
You can use the validator to hot-fix these issues:
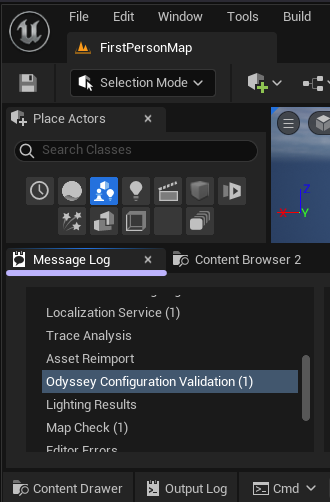
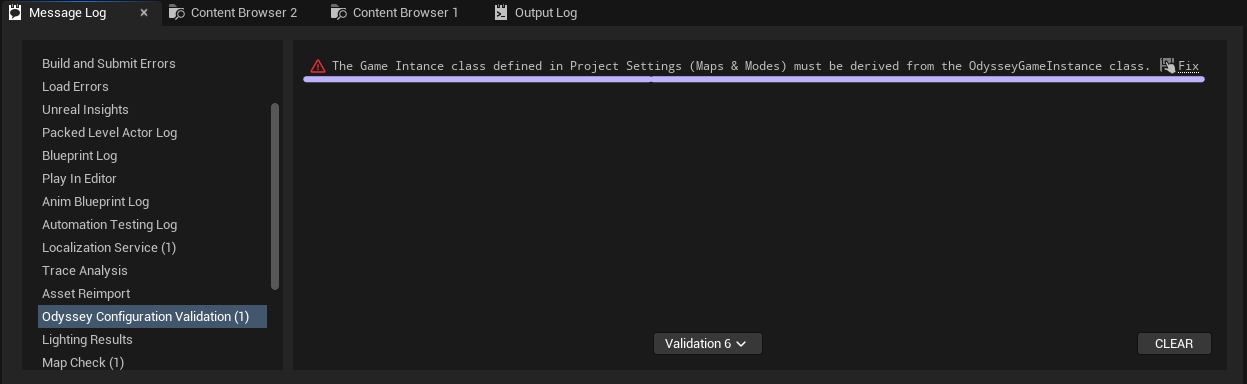
1. Select `Inspect Errors` on the validator notification Or, go back to your main World Editor window and open up the **Message Log -> Odyssey Configuration Validation**:
2. In the Message Log window, you will see all the issues reported by the Odyssey Validator. Click on the **Fix** hyperlink next to the message:
3. The auto-fix window will list all changes it wants to make for you. Click Continue to let it run the auto-fix scripts:
4. After continuing with the auto-fixes, you can rerun the validator. If fixes were resolved the validator should now succeed.
{% hint style="warning" %}
In C++ projects some of the auto-fix options are not available.
In these cases the validator gives you detailed information on what changes need to be made in your C++ codebase.
{% endhint %}
# Troubleshoot "Project zip is invalid"
## When I select my zip file to upload, it says *Project zip is invalid*
This means your .zip file doesn't contain the right files. Try the below, and if it's still broken, feel free to contact us on [Discord](https://discord.com/channels/926957916089634836/1093581069116244071) for more help.
1. Make sure you have the PixelStreaming UE plugin enabled.
2. Make sure you are packaging for Linux.
3. Make sure you zipped the `Linux` directory.
4. List the files in your .zip. It should look something like this:
```
Linux
Linux/Manifest_DebugFiles_Linux.txt
Linux/Manifest_NonUFSFiles_Linux.txt
Linux/Manifest_UFSFiles_Linux.txt
Linux/MyProject.sh
Linux/MyProject
Linux/MyProject/Samples
Linux/MyProject/Samples/PixelStreaming
Linux/MyProject/Samples/PixelStreaming/WebServers
Linux/MyProject/Samples/PixelStreaming/WebServers/get_ps_servers.bat
Linux/MyProject/Samples/PixelStreaming/WebServers/get_ps_servers.sh
Linux/MyProject/Content
Linux/MyProject/Content/Paks
Linux/MyProject/Content/Paks/MyProject-Linux.pak
Linux/MyProject/Content/Paks/global.utoc
Linux/MyProject/Content/Paks/MyProject-Linux.ucas
Linux/MyProject/Content/Paks/global.ucas
Linux/MyProject/Content/Paks/MyProject-Linux.utoc
Linux/MyProject/Binaries
Linux/MyProject/Binaries/Linux
Linux/MyProject/Binaries/Linux/MyProject.debug
Linux/MyProject/Binaries/Linux/MyProject
Linux/MyProject/Binaries/Linux/libNvmlWrapper.so
Linux/MyProject/Binaries/Linux/MyProject.sym
Linux/Engine
Linux/Engine/Content
Linux/Engine/Content/SlateDebug
Linux/Engine/Content/SlateDebug/Fonts
Linux/Engine/Content/SlateDebug/Fonts/LastResort.tps
Linux/Engine/Content/SlateDebug/Fonts/LastResort.ttf
Linux/Engine/Extras
Linux/Engine/Extras/GPUDumpViewer
Linux/Engine/Extras/GPUDumpViewer/OpenGPUDumpViewer.bat
Linux/Engine/Extras/GPUDumpViewer/GPUDumpViewer.html
Linux/Engine/Extras/GPUDumpViewer/OpenGPUDumpViewer.sh
```


 [**Embed API**](/embed-in-a-website/enable-embedding)